“Bitbucket Pipelines and Ansible: Continuous delivery for your Django project” was originally published as a guest post on Bitbucket Blog.
Introduction
Ansible is a powerful tool for the automation of your server administration. It can be used both to install and configure the software needed for your application and to deploy a new version of your application.
Bitbucket Pipelines are basically Docker containers, hosted in the Bitbucket infrastructure, that you can launch automatically to build or deploy your code. They can be attached to “events” happening in your repository, usually a push on one branch.
These tools are complementary to each other, because on Ansible you can define exactly what you want to do on your target server to deploy your application, while on Bitbucket Pipelines you can configure and launch a container to perform the actual deploy.
In a previous post I described how to deploy a Django project using Ansible. Here I explain how to make a step further and deploy a Django project using Bitbucket Pipelines and Ansible.
The use-cases for deploying a Django project automatically are many. Even if your Django project has a simple architecture, there are many steps you have to perform in the right order to complete a successful deploy in the general case. As a bare minimum you’ll have to: update the application code, install or update project dependencies, migrate the database, collect static files, restart the application server.
Automating all these steps in a reproducible and formal way will save you a lot of time in the long run and will help you to avoid human errors. Think about how many times you’ll deploy a new version of your application in the future.
If your architecture is more complex, the number of steps to perform will be larger and the deploy process will be more error-prone, so the benefits of an automated deploy will be even greater.
Let the automation begin!
You can clone or fork this Bitbucket repository to follow along with this tutorial.
First thing first, add a file named bitbucket-pipelines.yml to the root of your repository. The content of the file should be similar to this:
# use the official Python 2.7.16 docker image
image: python:2.7.16

pipelines:
  branches:
    # deploy only when pushing to the master branch
    master:
      - step:
          name: Deploy to prod
          # this is the name of the Bitbucket Deployment
          deployment: Production
          caches:
            # cache the Ansible installation
            - pip
          script:
            # install Ansible
            - pip install ansible==2.8.0
            # go into the ansible directory
            # in this same repository
            - cd ansible
            # perform the actual deploy
            - ansible-playbook -i ./hosts deploy.yaml
Let’s examine the configuration line by line:
- On line 2 you define the docker image you want to use;
- On line 7 you define the branch that will trigger the deploy (master in this example);
- On line 11 you define the deployment, that is basically an environment (managed by Bitbucket) where you can define some variables. In this way you can have different deployments (staging, production, …) with different variables that you can use in your build/deploy steps. In this example I do not use this feature, and I merely use one of the default Bitbucket deployments (named Production) without configuring any variable in this environment;
- On line 14 you are asking Bitbucket to cache the installation of packages installed by pip. This is useful to avoid to reinstall every time the Python libraries you need for your deployment (Ansible 2.8.0 in this example) from scratch. The build time for Bitbucket Pipelines is limited to 50 minutes/month in the free plan, so it’s important to have the libraries already installed to save some build/deploy time.
- From line 16 to line 22 you define the actual steps for deployment: install Ansible (if not already cached), go into the ansible directory, make the deploy. Please check the playbook ansible/deploy.yaml to see what it will actually do on the target server.
Ansible will perform the actual deploy by:
- pulling the master branch from your Git repository;
- installing all needed production requirements;
- running Django migrate and collectstatic commands;
- restarting the application server uwsgi.
Please check the Ansible playbook ansible/deploy.yaml to see what it will actually do on the target server in details.
Commit and push the bitbucket-pipelines.yml file on the root of your Bitbucket repository.
Setup your pipelines
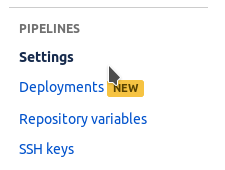
Now go on your repository settings and click Settings under the section PIPELINES:
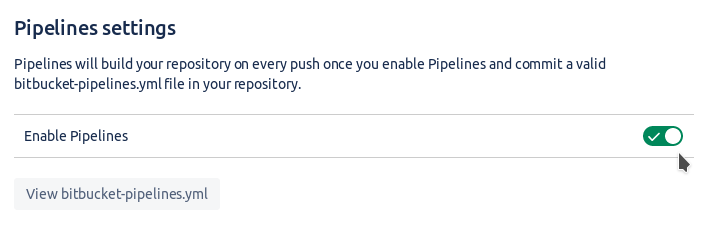
Now click on Enable Pipelines:
If you have read my previous post on how to deploy a Django project using Ansible, you should know that Ansible work through an SSH connection made between the client host (the Bitbucket Pipeline docker container in this case) and the server where you want to deploy your code.
For this SSH connection to work you have to setup an SSH public/private keypair on the Bitbucket Pipeline, and allow the public key on your server authorized_keys.
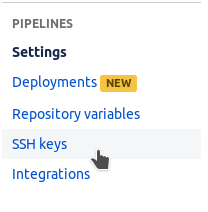
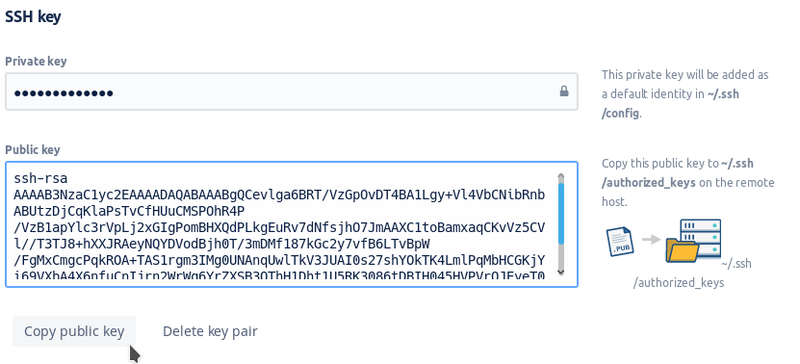
Go on the settings of your repository, under PIPELINES navigate to SSH keys:
Now click on “Generate keys” to let Bitbucket generate a new SSH keypair for you.
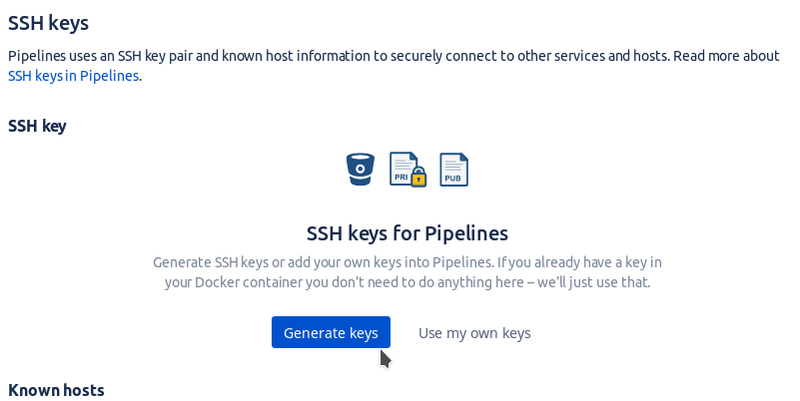
Now you can copy the generated public key and paste it in the .ssh/authorized_keys file of your deploy target.
You’ll also have to add your server fingerprint to the Known hosts section in the same page. Insert your target server hostname in the “Host address” field, press the “Fetch” button and finally the “Add host” button.

You can refer to the Bitbucket documentation about SSH keys, if you need more details.
You can test that the deploy is working simply by pushing some changes to the master branch of the repository
If you want to push some changes on master, but you do not want to deploy the change automatically on the server, you can put the string [skip-ci] in your commit message.
Conclusion
In this tutorial I explained a simple yet powerful setup for the continuous delivery of a Django project. This is only a little example of what you can do with Bitbucket Pipelines and Ansible, but I hope that this helped you to understand the great potential of these technologies.
I think that learning and implementing this kind of automation in your projects is always worth the effort. Time saved and less human errors in the deploy process will make a big difference in the long run.