In this tutorial you will learn how to use VS Code for remote debugging. I’ll show you how to debug a Django application running on a remote server over SSH or in a Docker container.
Imagine the following scenario: You developed a Django application on your laptop. You did your tests and made some debug. The application worked fine. Finally you deploy the application on a production server. Something goes wrong. There is a bug to hunt down and you cannot reproduce it locally.
You could connect to the remote server using SSH, then use a remote editor like vim on nano to tweak the code. You could put some print("I'm here!") here and there, trying to find the bug.
But wait, aren’t you a VS Code user? Why you have to debug in an editor you don’t know? Wouldn’t be great if you could connect to the remote environment from VS Code and debug your application inside the IDE you love?
It turns out that VS Code has some extensions made exactly for that purpose, and you’ll learn how to use them.
At the end of this tutorial you will be able to:
- Connect with VS Code to a remote server using SSH and remotely debug a web project.
- Run a Docker container within VS Code and debug a project inside the container.
Before starting the tutorial let me say that I assume you are actively using Visual Studio Code for development and you already know how to install VS Code extensions and how to manage a Python project in the IDE. If you need a refresh you can check this introductory tutorial.
1. Remote Debugging Over SSH
The first scenario I will present is remote debugging on a server that is accessible via SSH. I assume that you already know how to connect to a remote server using SSH. You can find good resources on the internet if you need more information.
What if You Do Not Have a Remote SSH Server?
Of course to follow along with this part of the tutorial you’ll need an SSH remote server to connect to. If you don’t have one readily available you can spin up a local virtual machine using Vagrant.
After installing Vagrant and VirtualBox, creating a virtual machine is as simple as:
$ vagrant init hashicorp/bionic64
$ vagrant up
You’ll find an Ubuntu Server listening for SSH connections on localhost:2222. Username is vagrant, password is vagrant. Easy enough!
If you prefer to test on a real remote environment, you can create a virtual machine on Azure.
In this tutorial I’ll use the Vagrant method to spin up a test SSH “remote” server on localhost, port 2222.
Install the VS Code Extension
First of all you have to install the Remote – SSH extension from the VS Code marketplace. Go to the Extensions section in VS Code and install the extension from there:
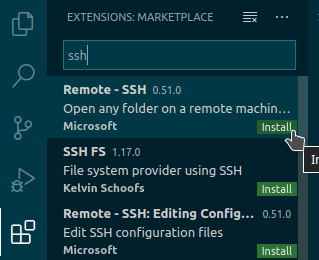
If the extension has been installed correctly you will see a new green icon in the bottom left corner of the VS Code window.
Generate an SSH Key Pair and Configure Server for Remote Access
You’ll need to access the SSH server without entering the passphrase every time. For this you’ll need an SSH keypair to connect to the server. If you don’t already have one you can generate one by typing:
ssh-keygen -t rsa -b 2048
You can leave the SSH key passphrase empty, when prompted. In this way the public key will be saved in the .ssh/id_rsa.pub file under your home directory.
The last step is copying the public key on the remote server and appending it to the .ssh/authorized_keys file, inside the home directory of the remote user you’ll use to connect.
If you are using the test SSH server created with Vagrant, as shown previously, the commands to copy the SSH public key in the right place are:
localhost:~$ scp -P 2222 ~/.ssh/id_rsa.pub vagrant@localhost:
localhost:~$ ssh -p 2222 vagrant@localhost
vagrant@vagrant:~$ cat id_rsa.pub >> ~/.ssh/authorized_keys
When prompted for a password remember that both the username and the password are vagrant.
The last command is ran on the remote SSH server. You should now be able to login to SSH server without the need to write your passphrase.
Connect to Remote Server in VS Code
It’s time to connect to the remote server in VS Code. Click on the green icon on the bottom left corner:
![]()
A command prompt will appear at the top of the windows, click on Remote-SSH: Connect to Host….

If you already have some SSH servers configured in your .ssh/config file you’ll see them listed here. In our example we will connect to a new SSH server, by writing the connection parameters in the user@host:port form.

Press Enter and a new VS Code windows will appear. That’s literally your window to the remote system.
The file explorer will let you to add remote directories in your workspace. You’ll be able to edit files as if they were local.
You can even open a terminal inside VS Code and it will act as a remote terminal. You’ll make use of the remote terminal in the following section.
Create a Simple Django Project on Remote Server
A Django project will serve just as an example of what you can do with VS Code SSH extension to debug your remote application. Even if you’re not familiar with Django you’ll be able to follow along with the tutorial. If otherwise you’d like to better understand what you are doing here you can read this introductory Django tutorial.
In the VS Code remote window, open a terminal using the “Terminal > New terminal” menu. Notice how this terminal is running on the remote server, and not locally on your machine.
First you’ll need to install a package on the remote server. This is needed to create a virtualenv for the project:
vagrant@vagrant:~$ sudo apt update
vagrant@vagrant:~$ sudo apt install python3-venv
Then you can create a virtualenv and activate it:
vagrant@vagrant:~$ python3 -mvenv vscode-example-env
vagrant@vagrant:~$ . vscode-example-env/bin/activate
Now install Django on the virtualenv and create a new project:
(vscode-example-env) vagrant@vagrant:~$ pip install django==2.2.12
(vscode-example-env) vagrant@vagrant:~$ django-admin startproject vscode_example
Mapping Ports to Test the Project
Now that you’ve created the example Django project, go into the project directory, create/migrate the Django database and run the Django development server:
(vscode-example-env) vagrant@vagrant:~$ cd vscode_example
(vscode-example-env) vagrant@vagrant:~$ ./manage.py migrate
(vscode-example-env) vagrant@vagrant:~$ ./manage.py runserver
Watching for file changes with StatReloader
Performing system checks...
System check identified no issues (0 silenced).
April 01, 2020 - 17:35:01
Django version 2.2.12, using settings 'vscode_example.settings'
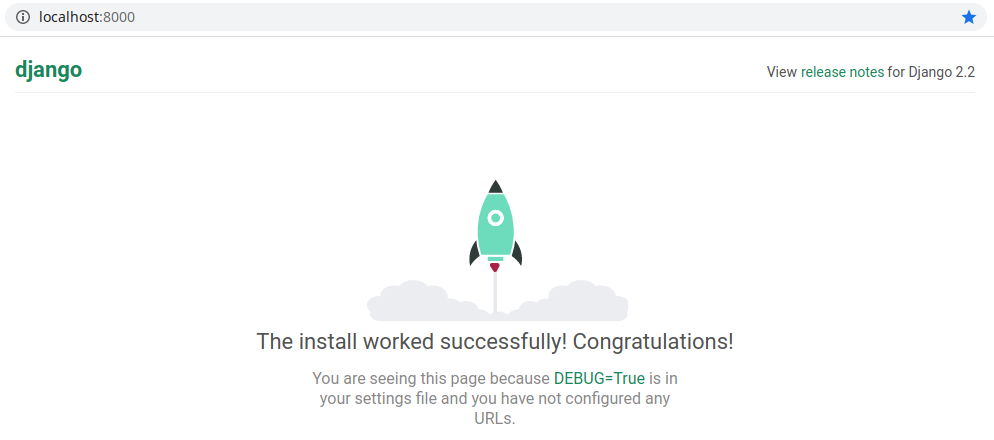
Starting development server at http://127.0.0.1:8000/
Quit the server with CONTROL-C.
As you can see from the command output the Django development server is listening on http://127.0.0.1:8000/.
Note: Don’t confuse the http://127.0.0.1:8000/ you see here. That is the localhost of the server and not the local address of your PC.
That address will not be accessible from your PC because it’s local to the server. Fortunately VS Code lets you map ports of remote server to ports of your PC. This will let you access server ports as if they were local.
Click on VS Code “Remote explorer” left pane:
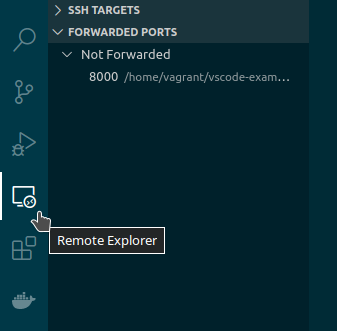
You’ll see that in the “Forwarded ports” section there is a port on the server that is “”Not Forwarded”. Hover with your mouse on the port and click on the “+” icon:
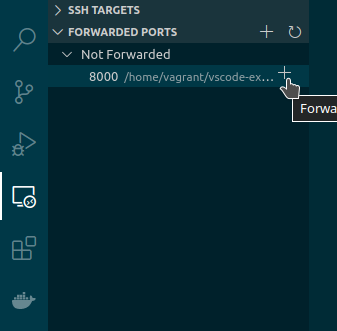
Now that the server 8000 port is mapped on your PC 8000 port, you’ll be able to access your Django project on http://localhost:8000/:
Note: Don’t forget to forward the 8000 port every time you restart the Django development server.
A buggy Django app
Now that you have a Django project running remotely why don’t you create a Django app to test some remote debugging? Let’s do it!
Back to the VS Code terminal and stop the Django development server with CTRL-C. Then create a Django app:
(vscode-example-env) vagrant@vagrant:~$ ./manage.py startapp todo
Every example project has a todo app, isn’t it?
Now it’s time to edit some files remotely using VS Code. As promised you won’t use vim or nano over SSH!
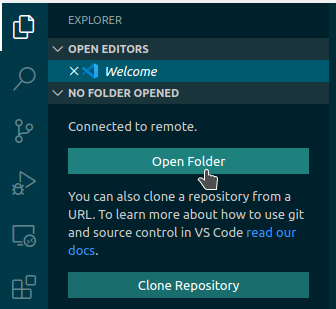
Click on the VS Code file explorer pane, then on Open Folder button:
From the menu choose the directory you want to add to VS Code workspace, that is vscode_example in our case:
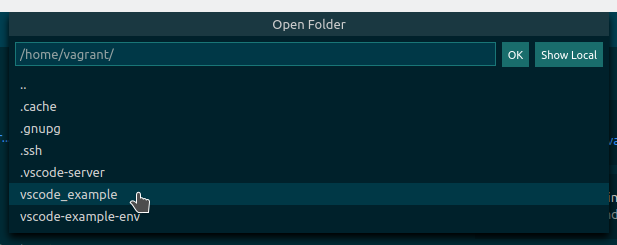
Select the directory and click on “OK”. Now you can browse the remote files in the VS Code file explorer!
Open the todo/view.py file and add the following code:
from django.http import HttpResponse

from random import choice

def random_todo(request):
    todo_list = [
        'Buy milk',
        'Clean the room'
        'Write tutorial',
        'Read books',
    ]
    return HttpResponse(choice(todo_list))
Then open the vscode_example/urls.py file and edit like this to add a route to the view:
from django.contrib import admin
from django.urls import path

import todo.views

urlpatterns = [
    path('admin/', admin.site.urls),
    path('todo/random/', todo.views.random_todo),
]
Now you can return to the terminal and restart the Django development server:
(vscode-example-env) vagrant@vagrant:~$ ./manage.py runserver
Check that the virtualenv is active before running the server. Also check that the port 8000 is mapped in the VS Code “Remote explorer” left pane, as seen previously.
Open your web browser and go to the newly created url at http://localhost:8000/todo/random/. You should see a randomly chosen todo item. Try to refresh the page a couple of times, and then a bug will show up:
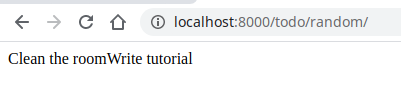
There is something wrong in our todo list! Of course you can spot the bug quite easily in our toy project, but why don’t leverage a full featured debugger in VS Code to check what’s going on?
Debugging in VS Code
Stop the Django development server with CTRL-C and click on the VS Code “”Run” left pane. There you’ll see a create a launch.json file link.
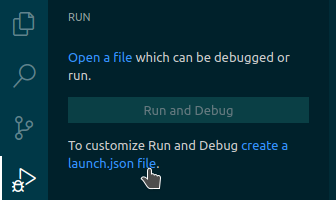
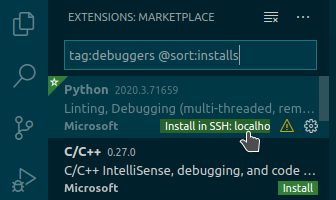
Click on the link and select More… from the menu. You can then install the Python extension on remote server by clicking on Install in SSH: localhost.
The remote extension will install and you’ll have to reload the VS Code window to activate it.
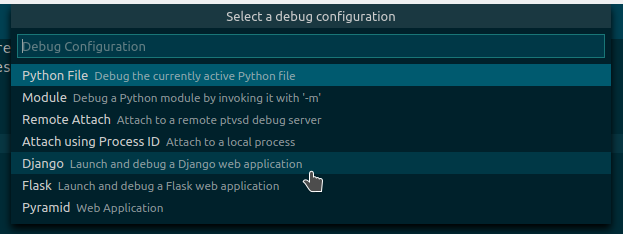
Go back to the Run left pane and click on create a launch.json file link again. This time you’ll see a Django item in the menu. Click on it.
A launch.json file will open in VS Code. You’ll only have to add the path to your virtualenv, by adding a pythonPath entry in the configuration.
{
    // Use IntelliSense to learn about possible attributes.
    // Hover to view descriptions of existing attributes.
    // For more info, visit: https://go.microsoft.com/fwlink/?linkid=830387
    "version": "0.2.0",
    "configurations": [
        {
            "name": "Python: Django",
            "type": "python",
            "request": "launch",
            "pythonPath": "/home/vagrant/vscode-example-env/bin/python",
            "program": "${workspaceFolder}/manage.py",
            "args": [
                "runserver",
                "--noreload"
            ],
            "django": true
        }
    ]
}
Now you can run the project for remote debugging in VS Code by hitting F5. Go to the todo/views.py file and add a breakpoint on line 13:
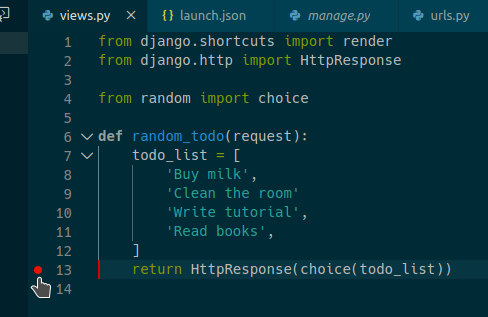
Then try to reload the http://localhost:8000/todo/random/ page. You’ll see that execution will block and you’ll be able to inspect variables in VS Code:
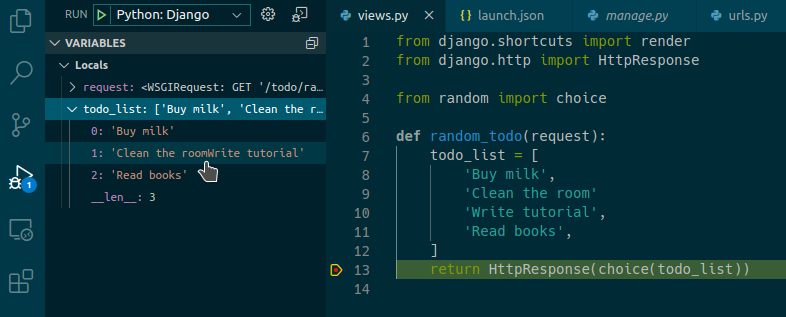
In this simple case the bug was a missing comma in the todo_list definition.
That was a trivial bug in a simple project, but imagine to leverage the power of VS Code debugger in a real project running remotely. Now you learned all the tools needed to accomplish this task and make your remote debugging easier.
2. Remote Debugging on a Docker Container
Remote debugging can be useful also on another common scenario: debugging a project while running in a Docker container.
Suppose that your team uses a Docker container to have a common and established development environment. You can leverage VS Code Remote – Containers extension to build and run the container and attach to it for remote debugging.
I assume that you have some basic knowledge on how to obtain a Docker image and run it either by using Docker command line or VS Code Docker extension. If you need more information you can refer to this tutorial.
Install Docker
You have to install Docker to follow this tutorial. If you are on Windows or Mac you can install Docker Desktop. If you are on Linux you can install Docker using your distribution package manager.
Install the VS Code Extension
The next step is to install the Remote – Containers extension from the VS Code marketplace. Go to the Extensions section in VS Code and install the extension from there:
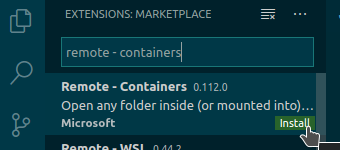
If the extension has been installed correctly you will see a new green icon in the bottom left corner of the VS Code window.
Clicking on the green icon will bring up the Remote - Containers commands.
An Example Container for Your Project
In this tutorial you’ll clone an example project container from a Git repository. That container uses the same example Django application seen in previous section of this tutorial. It will serve as a starting point to see how you can build, run and perform remote debugging on a Python project running in a Docker container.
Clone the repository using Git:
git clone https://github.com/baxeico/vscode_django_container.git
Go into the vscodedjangocontainer directory and launch VS Code:
$ cd vscode_django_container/
$ code .
VS Code will notice that this directory contains a configuration for remote containers and it will prompt you to reopen the project in a container:
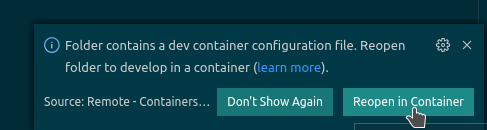
Click on the Reopen in Container button and VS Code will build the container and configure the project for remote debugging.
Understanding devcontainer.json
The Remote Containers extension will look for a file called devcontainer.json in the .devcontainer directory.
The content of the file will look like this:
{
    "name": "Django container example",
    "build": {
        "dockerfile": "Dockerfile",
        "context": "..",
    },

    // Set *default* container specific settings.json values.
    "settings": {
        "terminal.integrated.shell.linux": "/bin/bash",
        "python.pythonPath": "/usr/local/bin/python3",
    },

    // IDs of extensions you want installed when the container is created.
    "extensions": [
        "ms-python.python"
    ],

    // make a list of ports inside the container available locally.
    "forwardPorts": [8000],

    // run commands after the container is created.
    "postCreateCommand": "pip3 install -r requirements.txt; cd vscode_example; ./manage.py migrate",
}
In the build section you can define the parameters used to build the container. In this case you are using a Dockerfile contained in the same directory. The Dockerfile uses the Python3 official image from Docker Hub, without modifications.
In the settings section you can define some specific settings for VS Code, when running in the container. Notice how the pythonPath option is set to the python3 executable path in the Docker image.
The extensions section will let you define the VS Code extensions you want to install in the container. The ms-python.python is required to let you debug Python applications.
forwardPorts is useful to let you access your application as if it was local, by exposing container ports on the local host. Here you are mapping the 8000 port of the container to the same port of your local host.
postCreateCommand is used to install the requirements of the Python application using pip and to migrate the Django database after the container has been created.
Here you can find a complete devcontainer.json reference.
Debugging in VS Code
Clicking on F5 will start the Django application. You can open the browser and point it to http://localhost:8000/ to see the app running.
VS Code will let you debug the code, set breakpoints, inspect variables as if the project is running locally.
As usual, the launch configuration is made in the launch.json file, inside the .vscode directory. If you look at the example inside the container it will launch the Django application on port 8000.
This tutorial used a very simple Django app in a minimal Docker container. Imagine to use your own container and have your team working and remote debugging on it using VS Code.
All you have to do is to define a proper devcontainer.json for your environment and use the Docker image of your choice with your configuration.
3. Other Remote Debugging Scenarios
There are also other use cases for remote debugging that are covered by other VS Code extensions.
I’ll not go into much details here, but I think that it’s useful to know that these extensions exist.
WSL
Windows Subsystem for Linux is a feature in Windows 10 that will let you to install a complete Linux distribution (e.g. Ubuntu 18.04) in your local Windows 10 installation. The Linux and Windows installations will be isolated, so you cannot run and debug an application running in WSL directly from VS Code, if running on Windows.
You need the Remote WSL extension to remotely debug your application running in WSL, as it was local.
LiveShare
While technically this feature cannot be considered “remote debugging”, it is worth knowing that VS Code has a LiveShare feature that will let you share a debugging session with one or more colleagues.
You can think of it as a sort of “video conference” session where one developer is the host and he can share his VS Code window with other people.
Actually this feature is more powerful than a simple video conference session because for instance you’ll be able to debug the code concurrently, by inspecting different variables or files independently without having to negotiate control.
4. Conclusion
In this tutorial you learned how to:
- Connect with VS Code to a remote server using SSH and remotely debug a web project.
- Run a Docker container within VS Code and debug a project inside the container.
Using the correct tools you’ll never resort to wild debugging sessions over SSH using vim or nano. No more print("I'm here") to catch those nasty bugs! Now you learned how to use a full featured IDE for remote debugging.
I want to publicly thank Geir Arne Hjelle who helped me in shaping up the outline of this tutorial.